Bible Journaling is really popular out there! We Catholics don’t have an easy option available yet (Catholic Publishers, please release a Catholic Journaling Bible soon!), so we’ve been taking matters into our own hands!
I took a softcover New American (Catholic-approved) Bible and turned it into a DIY Hardcover Bible.
I covered up some of the notes sections with paint (or gesso) to make room for journaling and drawing. Here’s how: Catholic Journaling Bible!

Then, Lacy at Catholic Icing released these awesome World’s Cutest Bible Tabs and I knew I needed to further transform my Bible.
This printable of Bible Tabs is awesome. Each book of the Bible is represented with a cute picture along with the title of the Book. They are a perfect addition to my Catholic Journaling Bible!
Lacy’s templates were a little big for my Bible. When I printed the tags at 50%, they were a good fit for my 8.5″ Bible, but the titles of the books were too light and small to really read.
I imported the template into my favorite drawing program and added the titles in CAPS.

I also wanted to laminate the tags, but I wanted to maintain optimal adhesion by being able to open up each 2-ply tag to attach on either side of the page.
Lacy’s templates format the tags so that they share one folding line. When folded, the tags are double-sided, lining up perfectly and clearly visible from both sides of the Bible.
I discovered that I needed to fold each set of 4 tags and cut them out and carefully place them on the laminating film so that they wouldn’t touch.

I propped up my laminator so that the feed was no longer angled. I managed to laminate the tags (about 35 on a page) without any of the tags touching.

I had left at least a 1/4″ of white margin at the bottom of each tag. When I cut out the laminated pieces, I left a tiny lip of lamination around each tag to ensure that each piece would be sealed closed. I cut through the white margin at the bottom of each piece and was able to open up the folded tab for optimal adhesion to the pages. (I cut off the laminated ‘lip’ on either side of the bottom portion, so that I could open up the tag.)

The tag then slides easily onto the page and when I have it in position (1/8″ away from the last tag), I secure it in place with a thin strip of clear packing tape, on both sides of the page. The 1/4″ white margin of the tag just fits in the narrow margin of the page, so that it doesn’t cover any text.
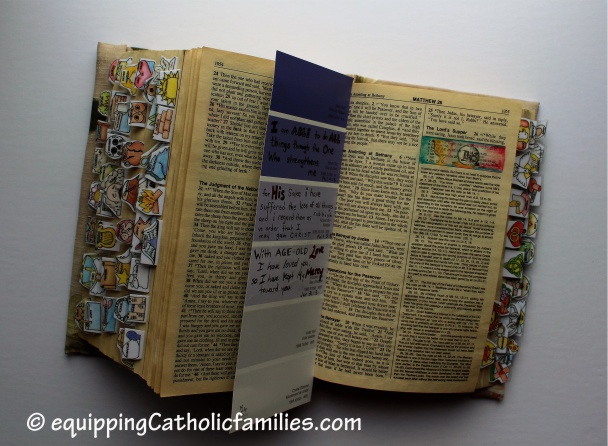
…and I’m using the paint chips as bookmarks to record my favorite Scripture…and maybe memorize them one day.


The tabs are aswesome and adorable, but honestly the reason I am commenting is to tell you how amazing the paintchip idea is! Scripture verses, commonplacing, just having free bookmarks, SO smart! Will absolutely be stealing this idea. 😛
Collecting paint chips…so many ideas how to use them!
OH so sweet i ´d like !!!!
Hi. May I know which drawing app did you use to edit the title section, please? Thank you!
I was also curious to know which art program, editor you used. Thanks
Monica or Lacey,
I want to get the ” Cutiest Bible tabs ever” but I would like to be able to change print to a script writing but am unsure how to do this? What program did you use? Also do they come uncolored? It would be nice to color them yourself. I absoutly love these tabs…they are by far the cutiest I have ever seen!
I love your instructions for laminating the tabs! Thanks for sharing about it. Seeing your posts I FINALLY got started in mine.
I love seeing pictures of these in someone else’s bible! Great job making them work for you.