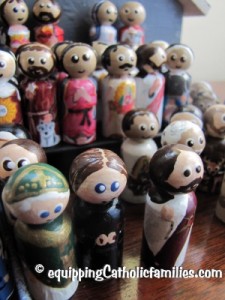
Our Wooden Painted Saints attracted a lot of attention at the IHM conference in Virginia! We had quite a few people asking to place orders for their own set!
These little wooden peg people are really fun to make so I thought that I would post a proper step-by-step tutorial. I have been particularly impressed with the tutorial picture style of this website and have tried to make my own version!
The Wooden Painted Saints required the following materials:
- Little wooden pegs from Casey’s Wood Products (Boy Peg – 1-11/16″ Tall x 5/8″ Diameter (#1006)
- acrylic paint and a selection of thin paint brushes
- toothpicks
 paint palette or recycled plastic chocolate box for paint-saving palette!
- holy cards, illustrated saint books and Google image search for Saint references
- fine tip Sharpie markers (very useful…but will likely destroy the marker for regular use!)
- clear coat varnish (I use latex for easy clean-up, Mod Podge would likely work as well)
The Wooden Painted Saints take time! You will need to wait for each layer of paint to dry before you handle them or add paint. Following the painting steps on three or five pegs at once takes advantage of drying time and each peg has ample time to dry between applications.
I have chosen very small wooden dolls! (Boy Peg – 1-11/16″ Tall x 5/8″ Diameter (#1006) Larger wooden dolls will make details easier to paint!
Some people talk about Wooden Painted Saint Exchange Parties…where each member paints 10 or 20 of the same saint and they are exchanged so that everyone gets a full set of Saints! So far…I haven’t found friends willing to paint a number of saints!
Painting the same saint would certainly simplify the process…but I found toggling back and forth between the 3 Saints on Google Image for reference worked well. I also numbered them on the base of each saint…but this was more for photographing purposes. I later paint the bottom base white…and I could add the Saint’s name with a Sharpie, before I cover the wooden doll with varnish.
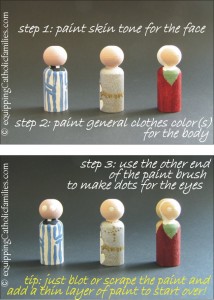
Step 1: paint at least one side of the head in skin tone. If the saint doesn’t have much hair, paint the whole head skin tone.
Step 2: paint the body with the clothing colors. Add as much detail as you can with toothpicks. Don’t worry if you make a mistake! Blot or scrape dried paint…or simply paint over top of a mistake!
Step 3: use the other end of the paint brush for perfect little dots. The size of the dot will depend on how wide the paint brush end is, how deep you dip the paint brush end into the paint and how much pressure you apply when you touch the paint brush end to the peg doll.
Tiny dots can be made by dipping a ’round’ toothpick (as opposed to a flat-style toothpick) in paint. Dots may be slightly irregular but the detail will add alot to the Wooden Painted Saint. Think clothing buttons, trim and texture as well as stubble or thin hair.
I made St Max’s glasses with a series of decreasing (size) dots, made with the end of the paint brush.
1. Black dot for rim of glasses 2. Flesh color dot (slightly smaller dot) to articulate the frame of the glasses 3. Brown dot (slightly smaller dot) for iris of St Max’s eyes 4. Tiny white dot (made with a toothpick) for accent in the eye.
For eyes without glasses:
1. white dot for eye outline 2. brown or blue (slightly smaller dot) for iris 3. tiny white dot (madewith a toothpick) for eye accent
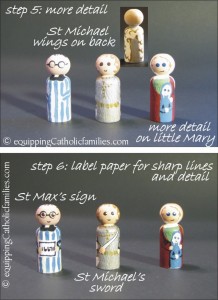
Step 5: The more detail the better…to distinguish the saints! I added wings to the back of St Michael and I added Mary to the front of St Anne. I applied the tiny little mouth on each saint with a sharpie…for maximum control over the detail.
Step 6: I wanted a nice straight edge for St Max’s sign and St Michael’s sword. I used leftover label paper (the throw-away parts of CD label paper) and printed St Max’s prisoner number with a sharpie. I simply cut out the thin shape of the sword for St Michael…and used the sticky back of the label paper to adhere the pieces in place. Alternatively…regular paper can be cut and glued in place. The final step of a clear coat varnish will perfectly seal the extra pieces onto the wooden pegs.
Step 6: Some of the other Saints I have painted required a little extra detail that I knew I wouldn’t do justice to, so I printed the tiny images to fit the little wooden peg dolls and glued them in place. Images are easy to find on a Google Image Search…and all you need is a color printer to print the tiny images on regular paper. You just need to be able to scale the images down to the appropriate size before you print them!
Step 7: Add a clear coat of varnish or Mod Podge for extra durability and shine. These Wooden Painted Saints will be a hit with the kids…but you will be glad you applied the protective varnish to prevent scraping or fading paint. The varnish is also great to keep extra paper images in place. Read the label for the varnish or Mod Podge…they may not be great for little toddlers who put small items in their mouth. That said…the smaller the wooden painted saints you use…the less appropriate for the younger (under 3) crowd.
 This is a little sneak peak at my work space. I love how the plastic chocolate box offers a close-able palette so that my paints won’t dry out when I take a break.
Note: this space is very enticing for little people! Don’t leave unattended unless you want some altered Wooden Painted Saints and a slightly messier work space!
Check out what we do with our Wooden Painted Saints…for use in classic board games, Christmas ornaments, treasure hunts, reward systems and limitless playtime with the Saints!











Hi, love your website.
Do you use gloss or matt varsnish on your peg dolls?
Kind regards
Maria
I have used both varnish and mod podge (one or the other) on all of my peg dolls…and I believe they are gloss finish. The shine adds intensity to the colors and has protected the little figures really well!
Hi Monica! Thanks for adding this great post to the “Catholic and Living it!” Link-up! Your little saints are adorable! ♥♥♥
What a great tutorial, and helpful tips…thank you!
Your wooden saints are beautiful!
This is great! I have always loved your painted saints. Now I can attempt to make some of my own. I just had an idea, I think I will have my Confirmation students make one of their patron Saint this year. I’m getting excited now!
I am having seven of the thirteen of us doing this project over tonight for a saints painting party! (I am doing St Peter and St Joshua) You couldn’t have posted this at a better time! I love the hints, especially for the eyes. Thank you!
ooh! I’d love to see pictures! Would you be willing to send me some pictures via email…or are you posting pictures online anywhere? mmcconkey { a t } rogers [ . ] com